Inventory Control
Inventory Control
Creating A Supplier
A supplier must first be created so the products can be attached to the supplier. This is done by going to the Inventory Menu and selecting “Suppliers”  You will need to Click “ADD” the enter you Vendors information and then Click “Save”

On the supplier “Other” tab you will enter the Payment Terms, Product Pricing and Trucking Co

Setting Up Items for Inventory Control
On the Product Master you will need to set up two different tabs. The Supplier and Pricing tabs
Supplier Tab
On the Supplier tab you will need to Click “Edit” and
Enter in the following fields.
- Select the supplier in the "Supplier ID" field
- Enter the "Supplier Item No". (This will be the Item number given to you by the supplier.)
- Enter the Supplier UPC Number if it's different from the UPC you created.
- Ensure the "Supplier Sells This Item" and the "Primary Supplier" boxes are checked.


Pricing Tab
On the Pricing tab you will need to select the product pricing that you wish to be the default cost of the product. This will be the price you paid for the product. On the Pricing Tab you will need to Click “Edit” and  Enter the following fields:
- Select the Product Pricing
- Enter in the cost of the product in the "Cost" field
- Check the "Cost Default" box
- Click "Save"


Purchase Order Overview
The purchase order entry form allows you to add, edit, delete, and print purchase orders. To receive products on a purchase order, you need to add receipt transactions on the transaction screen.
Purchase Order Header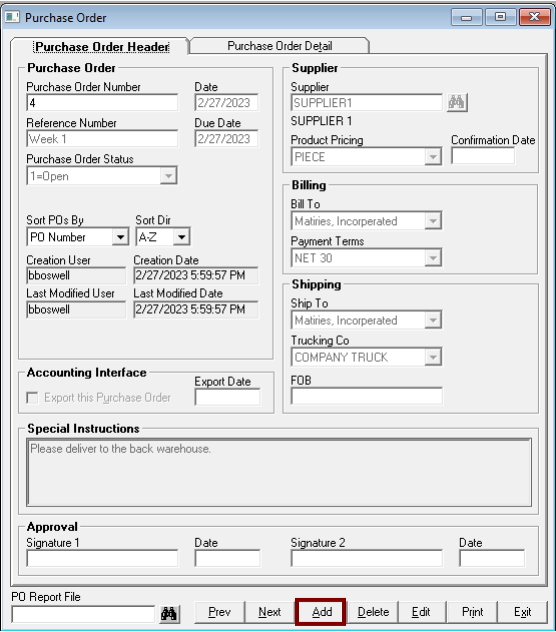

When adding a purchase order, the first thing you need to do is fill in the purchase order header form. You will need to Click the “Add” button.
-
The next purchase order number will automatically be placed in the purchase order number box. If you want a different number, edit the value now.
-
By default, the current date will be placed in the purchase order date field. If you want a different date, edit the value now.
-
The Reference Number can be placed here. − You may optionally specify a due date for the purchase order. The due date cannot be earlier than the purchase order date. This is the date you would like for the supplier to send you the ordered products.
-
New purchase orders default to Open status. If you want a different status such as Hold, select that value from the list. Matiries suggest that you leave it at the open status. When products are received the status will automatically be changed to received.
-
Select the supplier associated with this purchase order from the list. The supplier must have already been entered in the supplier master.
-
If you want to use a specific pricing structure for the line items on this purchase order, select it from the drop-down list.
-
If you have setup Default Ship To and Default Bill To locations in the Purchase Order tab of System Setup, those values will automatically be selected in the respective boxes. Otherwise, select the company locations you want to ship and bill to. The locations must already have been entered in the Company Locations master.
-
Select the Trucking Company from the Trucking Company list.
-
If this purchase order will be shipped Free on Board, enter the appropriate city in the FOB box.
-
In the Billing section you can enter the Bill To company and the Payment Terms.
-
Now click on the Purchase Order Detail tab and enter all the line products for this purchase order.
-
The Special Instructions will print on the Purchase Order.
-
The Export this Purchase Order box is automatically checked when you add a new purchase order. If you do not want to export the purchase order to an accounting program, un-check the box. The Export Date box shows you the date the purchase order was exported.
-
The Accounting Interface section is only available, if you have the accounting interface module.
Purchase Order Detail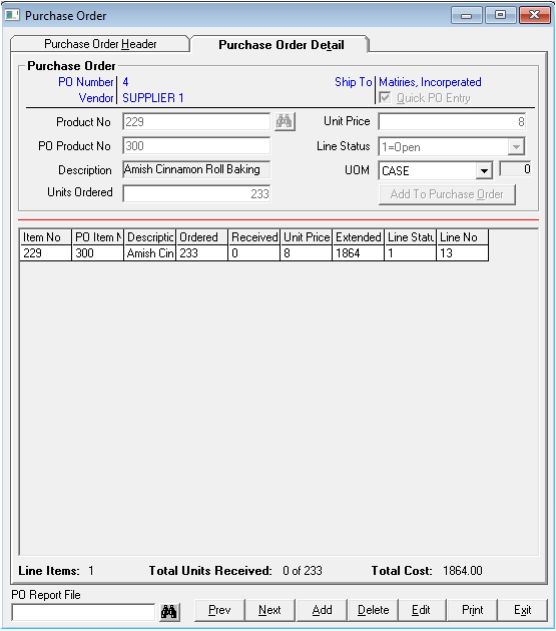

The purchase order detail tab is where you enter the line products that will appear on a purchase order.
-
If you want to quickly enter products, select the Quick PO Entry box.
-
If you want the Supplier's product numbers to be printed on the purchase order rather than your own product numbers, click on the Use Supplier Product Numbers box. You may set the Use Supplier Product Numbers flag in the Purchase Order tab of System Setup to 1 (one) if you want to always use supplier product numbers.
Entering a line Product
- Enter the product number in the Product Number box.
- Enter the quantity of the product to be ordered in the Units Ordered box.
- If a default cost has been specified for this product in the Product Master, it will be displayed in the Unit Price box. Otherwise, you need to enter a price in that box.
- By default, line products have an Open status. If you want a different status for this product such as Hold, select it from the list.
- Click on Add to Purchase Order to add this product to the purchase order line product list. If quick PO Entry is checked all you have to enter is the item and the units ordered. After the quantity is entered, the ordered items will be added to the list.
- The Line Products, Total Units Received, and Total Cost sums will be updated to reflect the new data. This is displayed at the bottom of the screen.
Entering Multiple Amounts for a Product
If you add a quantity of a product that already exists in the list, the new quantity will be added to the existing quantity and the unit price and order status fields will be changed to match the new product's fields.
Edit An Existing Product
To edit a line product, click on the product's row in the list. Change the information in the boxes then click Add to Purchase Order to update the list. If you change the value in the quantity box, the line product's quantity will be set to the new quantity.
Deleting An Existing Line Product
To delete a line product, click on the product's row then press the Delete key. Only open products can be deleted.
Transactions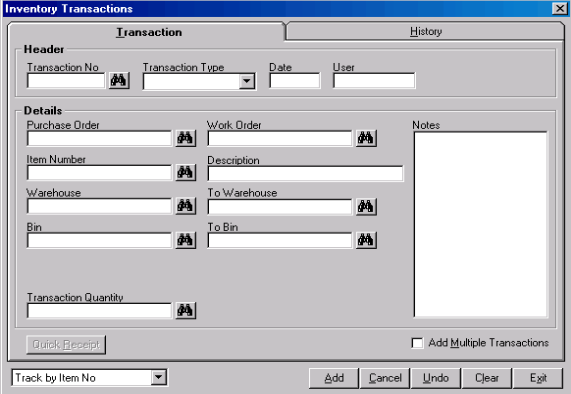

The transactions form lets you adjust the quantity of products in inventory, transfer products from one location to another, and receive and issue products in and out of inventory.
To see a list of all transactions that match a criteria, enter the criteria into the appropriate box and click the find button next to that box. For instance, to see all transactions for product number 100, you would enter 100 in the Product Number box then click the Find button next to the box.
Note: this only works if you are not currently adding a transaction. If you are in add more, the Find Button allows you to see available entries to select. This is the screen that you would use to receive products against Purchase Orders.
The history tab shows you all transactions since a user-specified date. To refresh the history list, enter a date in the Transactions Since box and click on the Find button next to that box. To see newly added transactions, enter the current date in the Transactions Since box and click the Find button next to that box.
You can select what type of tracking (scanning) to use for entering product numbers when adding a transaction from the drop down list. This tracking number allows you to scan item numbers, UPC numbers, etc on the transaction screen. To create a new transaction, click the Add button then select the transaction type from the Transaction Type list. You can add the following transactions:
• Adjustments
• Finished Goods Receipts
• Issues
• Receipts
• Transfers
To undo a transaction, bring up the transaction number you want to undo then click the Undo button. The original transaction will still show up in the history list, but a new transaction that undoes it will be added. If security is enabled in the System tab of System Setup, the user ID of the user who is currently logged in will automatically be added to the User box when adding a transaction.
Purchase Order Receipts
To receive products on a purchase order, you need to add receipt transactions from the transaction screen and enter the purchase order number in the purchase order box. You can enter a separate transaction for each product on the purchase order to receive it or click the Quick Receipt button to receive an entire purchase order at once. Quick Receipt receives all units ordered at the price and quantity entered on the Purchase Order. If quantities received are different than quantities ordered, go to the transaction screen and make the adjustments by entering a negative received amount if all of the items were not received, or add a positive amount if more items were received than ordered.
Adjustment Transactions
To adjust the quantity of a product in inventory, go to the Transactions form and click the Add button to add a new transaction. Then select Adjustment from the Transaction Type list.
Enter the product number or the tracking number of the product to be adjusted. The tracking number type is determined by the Tracking Number setting in the Inventory tab of System Setup. If you do not want to use tracking numbers for transactions, you should set the Use Tracking Number flag in the Inventory tab to 0 (zero).
In the Location and Bin boxes, enter the Warehouse and the Bin respectively where you want to adjust inventory levels. If you enter a warehouse or bin that does not exist, the program will ask whether you want to add it when you save the transaction.
Enter the quantity of the product in the quantity box. The quantity is the new inventory level of that product at the site and bin entered. For instance, if you wanted to change the amount of product 100 in Warehouse 1A of Warehouse 1 from 500 to 550, you would enter a quantity of 550 in the quantity box.
Enter any notes related to the transaction in the notes box. Click the Save button to save the transaction
Issue Transactions
To issue a product out of inventory, go to the Transactions form and click on the Add button then select Issue from the Transaction Type list.
If you are issuing against a work order, enter the work order in the work order box.
Enter the product number or the tracking number of the product to be issued. The tracking number type is determined by the Tracking Number setting in the Inventory tab of System Setup. If you do not want to use tracking numbers for transactions, you should set the Use Tracking Number flag in the Inventory tab to 0 (zero). If you enter a product number that is not on file, the program will ask whether you want to automatically add that product when you save the transaction.
In the Location and Bin boxes, enter the Warehouse and the Bin respectively from which you want to issue the products.
Enter the quantity of the product to be issued in the quantity box. You cannot issue more of a product than is on hand.
Enter any notes related to the transaction in the notes box.
Click the Save button to save the transaction.
Receipt Transactions
To receive a product into inventory, go to the Transactions form and click on the Add button then select Receipt from the Transaction Type list.
If you are receiving against a purchase order, enter the purchase order number in the purchase order box. You can set the Require PO Number flag to 1 (one) in the Purchase Order tab of the System Setup form to require a purchase order number for all receipts or allow receipts without a purchase order number.
To receive an entire purchase order at once, click the Quick Receipt button after entering the purchase order number.
Enter the product number or the tracking number of the product to be received. The tracking number type is determined by the Tracking Number setting in the Inventory tab of System Setup. If you do not want to use tracking numbers for transactions, you should set the Use Tracking Number flag in the Inventory tab to 0 (zero). You can also set the PO Receive Ordered Only flag in the Purchase Order tab to 1 (one) to prevent the receipt of non-ordered products if you wish. If you enter a product number that is not on file, the program will ask whether you want to automatically add that product when you save the transaction.
In the Location and Bin boxes, enter the Warehouse and the Bin respectively where you want to receive the products. If you enter a warehouse or bin that does not exist, the program will ask whether you want to add it when you save the transaction.
Enter the quantity of the product to be received in the quantity box. The PO Receipt Quantities flag in the Purchase Order tab of System Setup determines what quantities are valid when you are receiving against a purchase order. You can set it to 0 (zero) to allow any quantity, to 1 (one) to warn of overages, or to 2 (two) not to allow overages.
Enter any notes related to the transaction in the notes box.
Click the Save button to save the transaction.
Transfer Transactions
To transfer a quantity of a product in inventory from one location to another, go to the Transactions form and click the Add button to add a new transaction. Then select Transfer from the Transaction Type list.
Enter the product number or the tracking number of the product to be transferred. The tracking number type is determined by the Tracking Number setting in the Inventory tab of System Setup. If you do not want to use tracking numbers for transactions, you should set the Use Tracking Number flag in the Inventory tab to 0 (zero).
In the Warehouse and Bin boxes, enter the Warehouse and the Bin respectively where you want to transfer inventory levels FROM. If you enter a warehouse or bin that does not exist, the program will ask whether you want to add it when you save the transaction.
In the To Warehouse and To Bin boxes, enter the Warehouse and the Bin respectively where you want to transfer inventory levels TO. If you enter a warehouse or bin that does not exist, the program will ask whether you want to add it when you save the transaction.
Enter the quantity of the product to be transferred in the quantity box.
Enter any notes related to the transaction in the notes box.
Click the Save button to save the transaction.